


This tutorial is for the newbie’s who don’t know about the upgrading of the iPhone J…. so feel free to ask any queries I’ll help to my full extent.
This tutorial will guide through the process of jailbreak and upgrading of your iPhone (3G,3GS,4G and iPod 4G) step by step on Windows.
The software we will use is RedSnow which can be downloaded from the link given below:
DOWNLOAD LINK:
IPhone firmwares can also be downloaded from this link...
Things needed in this process are:
· ITunes installed on your computer
· IPhone (fully charged)
· Data cable
· RedSnow
· Required firmware


 ·
Pressing
home button but release the power button for 15 seconds.
·
Pressing
home button but release the power button for 15 seconds.


This tutorial will guide through the process of jailbreak and upgrading of your iPhone (3G,3GS,4G and iPod 4G) step by step on Windows.
The software we will use is RedSnow which can be downloaded from the link given below:
DOWNLOAD LINK:
IPhone firmwares can also be downloaded from this link...
Things needed in this process are:
· ITunes installed on your computer
· IPhone (fully charged)
· Data cable
· RedSnow
· Required firmware
Now we begin the process of upgrading…
Step 1:
Create a folder on your computer’s desktop named “Pwnage”.
Step 2:
Put RedSnow and desired firmware in this folder.
Step 3:
Extract the RedSnow.zip in the same folder.

Step 1:
Create a folder on your computer’s desktop named “Pwnage”.
Step 2:
Put RedSnow and desired firmware in this folder.
Step 3:
Extract the RedSnow.zip in the same folder.

Step 4:
Now open
the iTunes from your desktop.
Step 5:
Connect
your iPhone to iTunes.
Step 6:
By
pressing your shift key and clicking on the restore tab a window will open.
From there you go to the desktop and select the Pwnage folder and click on the
firmware. ITunes will now upgrade to your new firmware.


Now to
begin the jailbreak process
follow these steps….
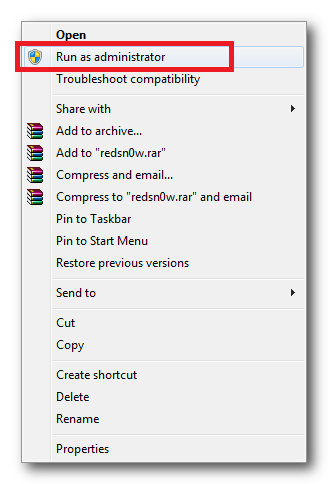
Step 1:
Step 1:
Go to
the desktop and open Pwnage folder and right click on the redsnow.exe and run
as administrator.

Step 2:
Connect
your iPhone and click on the jailbreak button.

Step 3:
Now turn
off your device and click “next” button.
Step 4:
This
step is critical to enter the DFU mode.
Follow the
instructions carefully:
·
Hold
the power button for 3 seconds

·
Without
releasing the power button hold the home button for 10 seconds.


Step 5:
The process
will start now but now do not press any button.
Step 6:
Select
Cydia and uncheck all others and click next button.

Step 7:
Your
device will restart now and when finished redsnow will notify.
Step 8:
Again
run RedSnow and click “extra” button.

Step 9:
Select
“just boot” and follow instructions and there you go enjoy the new firmware……
DON'T FORGET TO COMMENT AND SHARE THIS AMAZING TUTORIAL...
GUEST AUTHOR:This amazing post is from AMMAD HASSAN.you can also write a guest post feel free to contact us and share your knowledge with others
DON'T FORGET TO COMMENT AND SHARE THIS AMAZING TUTORIAL...
GUEST AUTHOR:This amazing post is from AMMAD HASSAN.you can also write a guest post feel free to contact us and share your knowledge with others
0 comments:
Post a Comment